Task: Read out the signal from an infrared remote with an infrared sensor.
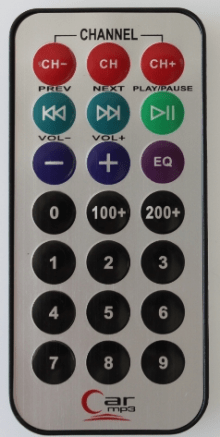
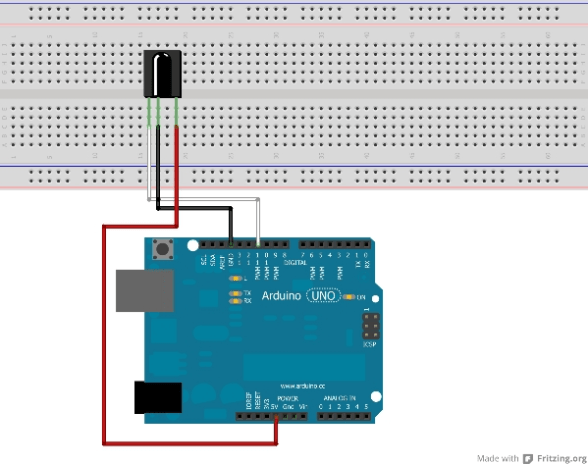
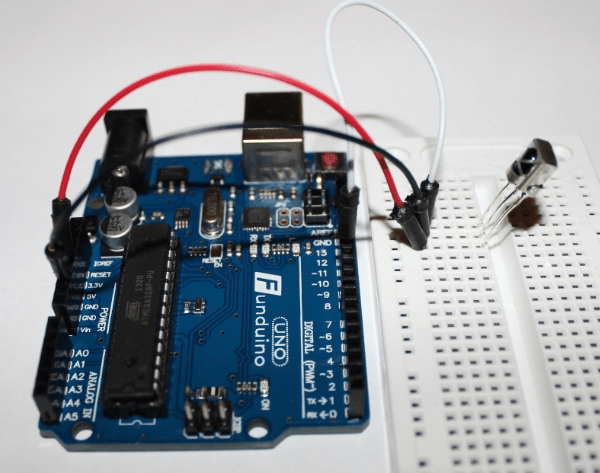
Required equipment: Arduino / breadboard / cable / infrared sensor / infrared remote control
With an infrared receiver, the Arduino board can receive the commands of an infrared remote control. The data are sent with infrared light from remote control to the receiver. Since our eyes can not perceive this light, we can not see this light. With a little trick you can see the light. Take your mobile-phone and look with the camera on the infrared diode of the remote while pressing a button on the remote. You will see the flashing infrared diode on the display of the mobile phone.
Setup:
The sketch is a variation of the sketch “IRrecvDemo”, and can be downloaded together with the very important IR-Remote-Library on the following website:
https://github.com/shirriff/Arduino-IRremote
Download the zip-package and copy the files into your “libraries” directory in the arduino software. Rename the downloaded directory to „Irremote“.
Now you can open the sketch in the sample-files in the arduino-software:
File -> Examples -> IRremote -> IrrecvDemo
Code:
/*
* IRremote: IRrecvDemo – demonstrates
receiving IR codes with IRrecv
* An IR detector/demodulator must be
connected to the input RECV_PIN.
* Version 0.1 July, 2009
* Copyright 2009 Ken Shirriff
* http://arcfn.com
*/ //Information about the original program “IrrecvDemo”.
#include <Irremote.h> //The program uses a library in this sketch. This saves us a lot of work, with //reading out the code of the infrared light.
int RECV_PIN = 11; //The contact which outputs the data gets connected with pin 11.
IRrecv irrecv(RECV_PIN); //Here we are defining an object, that is supposed to read out the infrared sensor //on pin 11.
decode_results results; //This command defines that the read out infrared data gets saved under “results”.
void setup()
{
Serial.begin(9600); //In the setup we are starting the serial connection, to see the data from the remote //on the serial monitor.
pinMode (13, OUTPUT);
irrecv.enableIRIn(); //This command initializes the infrared sensor.
}
void loop()
{ //The loop part is quite short because of the used library.
if (irrecv.decode(&results)) { //If data is received…
Serial.println(results.value, DEC); //..they should show up on the serial monitor as decimal number (DEC).
irrecv.resume(); //Receive the next value.
}
}
Pressing the „1“ button on the infrared remote control causes (in this case) the serial-monitor to write the number „16724175“. This is the decrypted number code behind this button.
If you hold the button permanently pressed, the number „4294967295“ appears. This is the code that indicates that a button is pressed continuously. This number does not depend on which button is pressed.
There can also appear other numbers if a key is pressed only very short or pulsating. In that case the sensor may not read a unique value.
Extension of the sketch: Switch on a LED by pressing button1 and switch it off with button2.
#include <Irremote.h>
int RECV_PIN = 11;
IRrecv irrecv(RECV_PIN);
decode_results results;
void setup()
{
Serial.begin(9600);
pinMode (13, OUTPUT); //Pin 13 gets connected with a LED (Output).
digitalWrite(13, LOW); //At first the LED should be tuned off.
irrecv.enableIRIn();
}
void loop() {
if (irrecv.decode(&results)) {
Serial.println(results.value, DEC);
if (results.value == 16724175) //If The IR receiver receives the number 16724175 (button 1)…
{digitalWrite (13, HIGH);} //…the LED gets turned on.
if (results.value == 16718055) //If the IR receiver receives the number 16718055 (button 2)…
{digitalWrite (13, LOW);} //….the LED gets turned off.
irrecv.resume(); // Receive the next value
}
}