There are different possibilities to create sound with the arduino. An active buzzer is the easiest way, because it only has to be connected with 5V. The sound is generated by the electronic inside the buzzer. The disadvantage, however, is that an „active buzzer“ can only produce a single sound – Melodies or siren sounds are not possible.
A passive buzzer gives us the possibility to create different sound, melodies and siren sounds with the arduino. That’s because the passive buzzer has no electronic inside, that only sets one sound.
Task: Create different sounds and melodies with a passive buzzer.
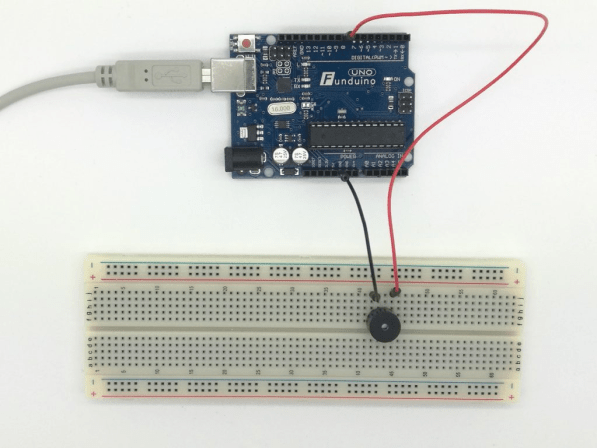
Equipment: Arduino / passive buzzer / Breadboard / cables
Setup:
The tone generation is mainly based on the „tone (x, y)“ command, the x value indicates the pin to which the positive contact of the loudspeaker is connected and the y value indicating the pitch.
Example:
tone(8,100); //The buzzer at pin 8 gets activated with a pitch of “100”
delay(1000); //The buzzer is activated for 1000 milliseconds (1 sec.)
noTone(8); //The buzzer at pin 8 is deactivated
Code 1:Simple tone generation
void setup() //No information needed in the setup
//the output gets automatically defined with the “tone” command

{
}

void loop()
{
tone(8, 100); // The"tone ( x , y )" command creates a sound
delay(1000); // with the duration of one second
noTone(8); // The tone is deactivated
delay(1000); // for one second
}
Code 2: Alternating pitches
In the second example, only a few lines are added in the main part (loop). This causes two tones alternately with the pitch „100“ or „200“,comparable to sirens. There is no delay between the sounds.
void setup()
{
}
void loop()
{
tone(8, 100);
delay(1000);
noTone(8); // This causes the first tone to stop
tone(8, 200); //The second tone with the pitch “200” starts
delay(1000); //for one second
noTone(8); //With this line the second tone stops and the loop starts over with
//the first tone
}
Code 3: Generating a sound with a button
In the third example, a button is added to Pin 6 in the setup. In the main part, the button is read out by an „if command„. If the button is pressed, a tone with the pitch „300“ starts for one second.

int button1=6;
int buttonstatus=0;

void setup()
{
pinMode(button1, INPUT);
}

void loop()
{
buttonstatus = digitalRead(button);
if (buttonstatus == HIGH)
{
tone(8, 300);
noTone(8);
}
}
Code 4: Sounds depending on different keys
In the fourth example, depending on the operation of different keys, it is to be decided which sound is emitted from the loudspeaker. For this purpose, a button is connected to pins 6 and 7. In the main part, two „if commands“ are used to decide which sound is output.

int button1=6; // button1 is connected to pin6 void loop()
int button2=7; // button2 is connected to pin7
int buttonstatus1=0; //variable to save the status of button1
int buttonstatus2=0; //variable to save the status of button2

void setup()
{
pinMode(button1, INPUT); //button1 is an input
pinMode(button2, INPUT); //button2 is an input
}

void loop(
{
buttonstatus1 = digitalRead(button1); //get status from button1 (HIGH or LOW)
buttonstatus2 = digitalRead(button2); //get status from button2 (HIGH or LOW)

if (buttonstatus1 == HIGH) //If button1 gets pushed..
{
tone(8, 100); //...output of a tone with a pitch of 100...
delay (1000); //...one second long...
noTone(8); //...than turn it off
}

if (buttonstatus2 == HIGH) //If button2 gets pushed..
{
tone(8, 200); //...output of a tone with a pitch of 200...
delay (1000); //...one second long...
noTone(8); //...than turn it off
}
}
Create melodies
The arduino software includes a file especially to create tones with a passive buzzer. Instead of numbers that define the pitch of a sound (tone(8, 200);), you can now select tones from the scale.
An example sketch in the arduino software is called “toneMelody”.

You can find it at “File” > “Examples” > “02.Digital” > “toneMelody”
There is already a file, where you can find the value according to the pitch. It’s called “pitches.h” and can be find in the second Cardreader. It is circled in the following picture.

The file can be used in your code if the file is opened in a tab and after you have added the command #include „pitches.h“ to your code. It makes sense to work with the example code “toneMelody”. This way you have already opened up the pitches.h tab for your code.
The following sketch is a quick example of two tones from the pitches.h file:
#inlcude “pitches.h”

void setup()
{
pinMode(8, OUTPUT);//buzzer at pin 8
}

void loop()
{
tone(8,NOTE_C4,1000); //Pin8 plays C4 1000ms long.

delay(3000);//The code pauses after the note sounds.This means that after the sound has been played to the end, two more seconds remain without any sound

tone(8, NOTE_G3, 1000); //Pin8 plays G3 1000ms long

delay(3000); //The code pauses after the note sounds.This means that after the sound has been played to the end, two more seconds remain without any sound.
}
The command “noTone” is no longer required because of the extended “tone-” command.
Command: “tone(x, y, z)”; x= Pin connected to the speaker, y= Pitch, z= Duration of the sound in milliseconds.