Attention:
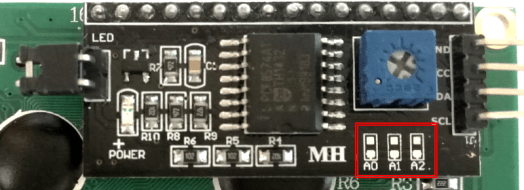
This tutorial only works if you have displays with three solder pads (A0,A1 and A2) on the I²C module like the circled ones on the picture below.
We will also need the NewliquidCrystal_1.3.4 library, which can be downloaded on this website: https://bitbucket.org/fmalpartida/new-liquidcrystal/downloads
The library has to be added to the arduino software as always (see previous tutorials like I²C Display)
Required equipment: Arduino / two Displays with I²C module / Breadboard / cables
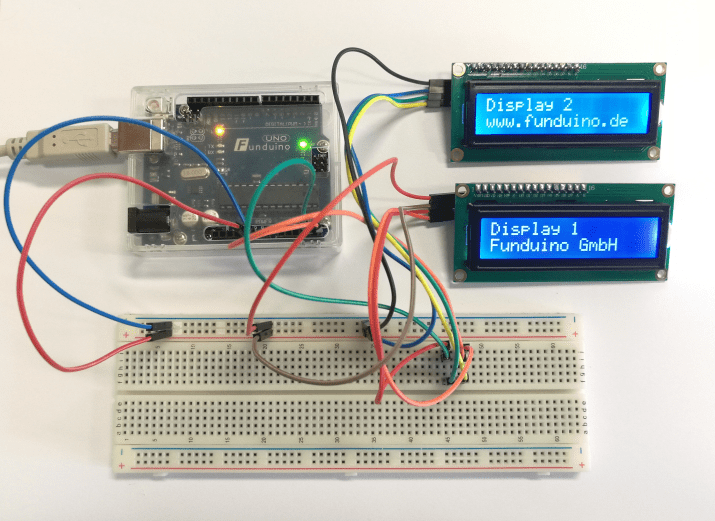
Task: We want two Displays with I²C module to show different texts on the same time. Therefore first we have to find out the I²C addresses of the displays and change one of them.
First a short explanation on the I²C address:
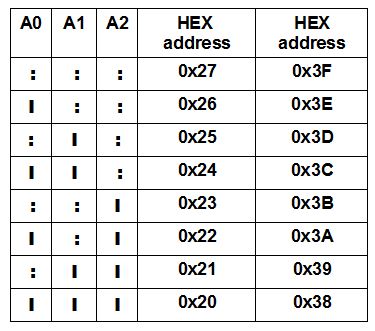
Each I²C module has a HEX address. In case of our displays, this address can be changed by soldering the A0, A1 and A2 solder pads. A new display has all three solder pads disconnected. Depending on which solder pad gets connected the address will change. So there are 8 different possibilities for an address. There can be two different types of addresses, depending on the type of display. The address either can be 0x27 or 0x3F at the beginning (all solder pads disconnected). Later in this tutorial we are going to learn how to find out about our displays address.
Possible HEX addresses, depending on the connected solder pads ( I = connected, : = disconnected):
Now the I²C address “Scanner”:
Basically the “Scanner” is just a code, that has to be uploaded on the Arduino while the Display is connected to the Arduino. After the code has been uploaded, you can see the HEX address of you display on the Serial Monitor from the arduino software.
1. Connect you I²C display with the Arduino:
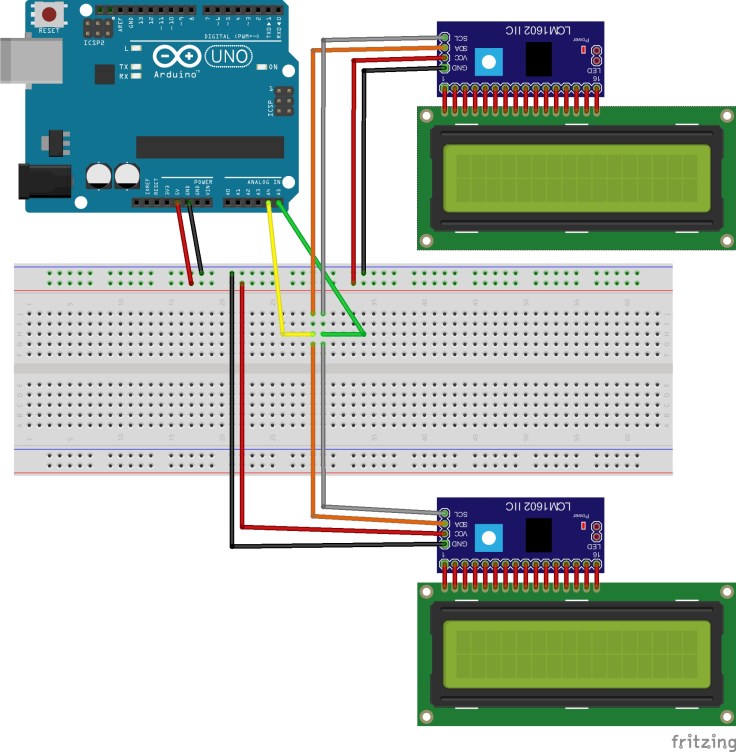
I²C LCD module >> Arduino
VCC >> 5V
GND >> GND
SDA >> A4
SCL >> A5
2. Upload the following step on your Arduino:
// I2C Scanner
// Written by Nick Gammon
// Date: 20th April 2011
#include <Wire.h>
void setup() {
Serial.begin (115200);
// Leonardo: wait for serial port to connect
while (!Serial)
{
}
Serial.println ();
Serial.println ("I2C scanner. Scanning ...");
byte count = 0;
Wire.begin();
for (byte i = 8; i < 120; i++)
{
Wire.beginTransmission (i);
if (Wire.endTransmission () == 0)
{
Serial.print ("Found address: ");
Serial.print (i, DEC);
Serial.print (" (0x");
Serial.print (i, HEX);
Serial.println (")");
count++;
delay (1); // maybe unneeded?
} // end of good response
} // end of for loop
Serial.println ("Done.");
Serial.print ("Found ");
Serial.print (count, DEC);
Serial.println (" device(s).");
} // end of setup
void loop() {}
3. Open the Serial Monitor from the Arduino software
4. Change the baud rate to 115200
5. Press reset button on Arduino if needed
Now this should appear on you Serial Monitor (HEX adress circled):

Back to the actual tutorial:
If we want two I²C displays, show two different texts on the same time, the displays have to have different HEX adresses. In this example we are going to connect the A1 solder pad of one display. So this display should now have the HEX address 0x3D (you can check it with the scanner). From now on we are going to call this display, display 2 and the other one display 1.
Setup: The displays have to be connected to you Arduino:
Code:
#include <Wire.h> //Include Wire.h library

#include <LiquidCrystal_I2C.h> //Include LiquidCrystal_I2C.h library

LiquidCrystal_I2C lcd1(0x3F, 2, 1, 0, 4, 5, 6, 7, 3, POSITIVE); //In this line we are calling the first //display lcd1 and we define the address as „3x0F“

LiquidCrystal_I2C lcd2(0x3D, 2, 1, 0, 4, 5, 6, 7, 3, POSITIVE);//In this line we are calling the second //display lcd2 and we define the address as „3x0D“

void setup()

{

lcd1.begin(16,2); //Start lcd1 and define how many rows and characters it has. 16 characters in 2 rows.

lcd1.backlight(); //Start the backlight of lcd1

lcd2.begin(16,2); //Start lcd2 and define how many rows and characters it has. 16 characters in 2 rows.

lcd2.backlight(); //Start the backlight of lcd2

}

void loop()

{

lcd1.setCursor(0,0); //Start the text in the first row at the first //character on lcd1..

lcd2.setCursor(0,0); //Same on lcd2..

lcd1.print("Display 1"); // lcd1 should show „Display 1“

lcd2.print("Display 2"); //lcd2 should show „Display 2“

delay(1000); // wait a second

lcd1.setCursor(0,1); //Next text should start in the second row at the first character of lcd1..

lcd2.setCursor(0,1); //Same on lcd2..

lcd1.print("Funduino GmbH"); //lcd1 should show „Funduino GmbH“

lcd2.print("www.funduino.de"); //lcd2 should show „www.funduino.de“

}
Now it should look like this: