Task: Show a text on an LCD Display.
Required equipment: Arduino / potentiometer / 14 cables / breadboard

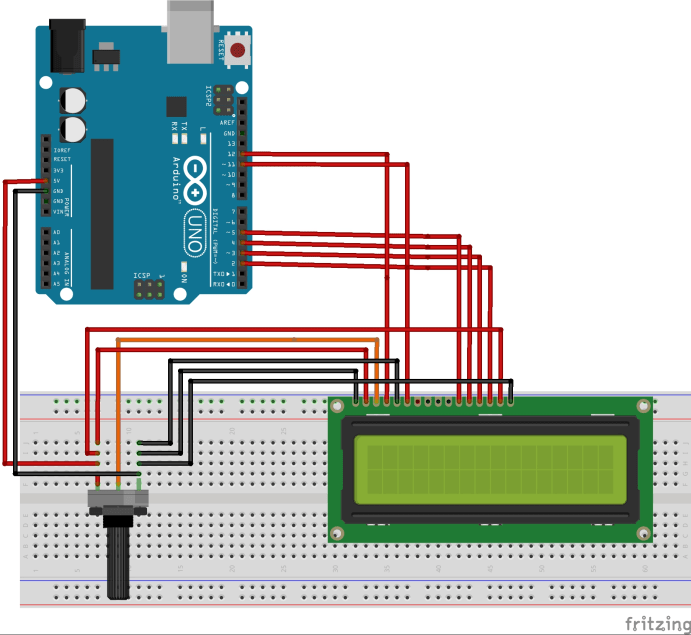
As you may see on the image, the wiring for this project is not that easy. It is because the LCD has to be connected with pretty many cables. Another difficulty is that there is no plug strip already on the LCD. You can either solder a plug strip to the LCD or solder the cable directly to the contacts of the LCD. If you want to solder the cables directly with the LCD we recommend to use flat cables (e.g. from an old hard drive or an old CD drive). Without any soldering it is quite impossible to get good results.
The potentiometer is needed to adjust the contrast. The back light of the LCD is powered with 5V. Because it is difficult to show the lettering on the LCD, in the image underneath you should try to count the contacts of the LCD. (Example: The first contact from the right to the left gets connected to GND. The second contact from the right to the left gets connected to 5V ….). Information: It is easier to use an LCD Keypad shield or an I2C LCD for more complicated projects because you don’t have to take so much time for the wiring of the LCD. But these two other options are more expensive than the simple LCD module.
Setup:
Now if the LCD is successfully connected we are ready to start with the programming.
Like many other components the LCD also needs to revert to a library in the code. This library is already a component of the arduino software. So you don’t have to install something on your own.
Code:
#include <LiquidCrystal.h> //Load the LCD library
LiquidCrystal lcd(12, 11, 6, 5, 4, 3); //In this line we define which pins on the microcontroller get //connected to the LCD (Better don’t change yet).
void setup() {
lcd.begin(16, 2); //In the setup we indicate how many signs and how many rows we are using. In this case: //16 signs in two rows.
}
void loop() {
lcd.setCursor(0, 0); //Start position of the cursor on the LCD (0,0 = first character in the first row).
lcd.print(„www.funduino.de“); // Write the text “www.funduino.de”
lcd.setCursor(0, 1); //Start position of the cursor on the LCD (0,0 = first character in the second row).
lcd.print(„good luck!!!“); // Write the text “good luck!!!”.
}
Extension of the sketch: We want to print alternately text on the first and on the second row. For this example we will use the words “up” and “down”.
#include <LiquidCrystal.h>
LiquidCrystal lcd(12, 11, 5, 4, 3, 2);
void setup() {
lcd.begin(16, 2);
}
void loop() {
lcd.setCursor(0, 0); //Start position first sign in the first row…
lcd.print(„up„); //..show the word “up”
delay (2000); //Wait 2 seconds
lcd.clear(); //Clear the display
lcd.setCursor(5, 1); //Start position fifth sigh in the second row…
lcd.print(„down„); //…print “down”
delay (2000); //Wait 2 seconds
lcd.clear(); //Clear the display
}
The LCD module is especially useful to show sensor values or other outputs from the microcontroller. You can also find help in the arduino software at the example sketches. There you can find many different examples at “LiquidCrystal”.